Welcome back to our comprehensive guide on the ZOYI ZT-703S, the versatile handheld oscilloscope that combines the functionality of an oscilloscope, signal generator, and multimeter into one compact device. In this installment, we’ll dive into the Probe Check ja Probe Attenuation Setting features, which are essential for ensuring accurate and safe measurements.
Why Probe Check is Important
Before you start using your ZOYI ZT-703S, it’s crucial to ensure that your probes are functioning correctly. A faulty or improperly compensated probe can lead to inaccurate measurements, which can be problematic, especially when dealing with sensitive circuits or high-voltage environments.
Safety First
When using the probe, always keep your fingers behind the safety collar to avoid electric shock. Never touch the metal parts of the probe when it’s connected to a high-voltage source. The ZOYI ZT-703S probes are rated for a maximum of 150V in the 1X range and 300V in the 10X range. Exceeding these limits can damage the instrument and pose a safety risk.

Manual Probe Compensation
When you first connect your probe to the ZT-703S, it’s recommended to perform a manual probe compensation check. This ensures that the probe is correctly calibrated and will provide accurate measurements. Here’s how to do it:
- Power on the ZT-703S and connect the probe to the signal input terminal.
- Input a 1KHz square wave signal.
- Paina AUTO key on the panel to automatically acquire the waveform.
- Observe the waveform display. If the waveform appears distorted, you may need to adjust the probe’s compensation.
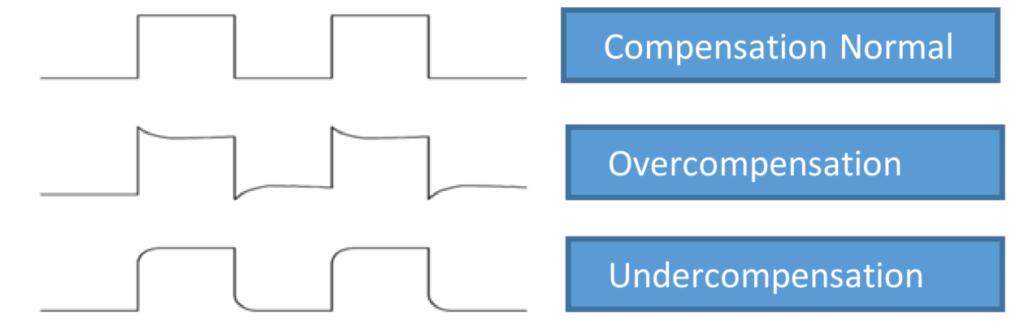
- Normal Compensation: The waveform should appear clean and square.
- Overcompensation: The waveform will show overshoot at the edges.
- Undercompensation: The waveform will appear rounded at the edges.
If adjustment is needed, use the adjustment tool (usually a small screwdriver) to tweak the probe’s compensation capacitor until the waveform appears normal.
Probe Attenuation Setting
The ZOYI ZT-703S allows you to set the probe attenuation to either 1X or 10X. This setting is crucial because it affects the vertical scale reading of the signal. Here’s how to ensure your probe attenuation is set correctly:
- Match the Probe Switch: Ensure that the attenuation switch on the probe matches the setting in the oscilloscope. If the probe is set to 1X, the oscilloscope should also be set to 1X. Similarly, if the probe is set to 10X, the oscilloscope should be set to 10X.
- Bandwidth Considerations: When the probe is set to 1X, the bandwidth of the oscilloscope is limited to 6MHz. To utilize the full bandwidth of the ZT-703S (up to 50MHz), set the probe to 10X or use a higher-specification probe.
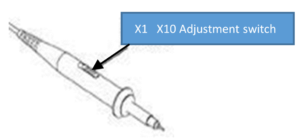
How to Set Probe Attenuation on the ZT-703S
- Paina MENU key to access the channel settings menu.
- Käytä F1 key to switch between CH1 ja CH2.
- Press F4 to toggle between 1X ja 10X attenuation.
- Ensure that the setting matches the physical switch on your probe.
By correctly setting the probe attenuation, you ensure that the vertical scale readings are accurate, which is essential for precise measurements.
Päätelmä
Properly checking and setting up your probes is a critical step in ensuring accurate and safe measurements with the ZOYI ZT-703S. By following the steps outlined in this guide, you can avoid common pitfalls and get the most out of your oscilloscope.
Stay tuned for our next installment, where we’ll explore more advanced features of the ZT-703S!